Ortelius Blog
Topics include Supply Chain Security, Microservice Management, Neat Tricks, and Contributor insights.
How to Bake an Ortelius Pi Part 3 | The Configuration

Introduction
In Part 1, of this series I walked through an installation of Ubuntu Server 22.04.4 LTS on the Raspberry Pis.
In Part 2, of this series we configured DHCP, DNS, NFS and deployed MicroK8s.
In Part 3 we will deploy the following:
- Deploy NFS CSI Driver for Kubernetes to connect to the Synology NAS for centralised storage.
- Deploy MetalLB load-balancer for a dedicated IP address an entry point into the Kubernetes cluster
- Deploy Traefik Proxy as the entrypoint for our Microservices
- Deploy Ortelius the ultimate evidence store for devops and open-source security validation
I will be using Helm Charts to configure some of the services as this makes getting started a lot easier. Also Helm Charts are great to compare configuration or reset values.yaml in case the plot is totally lost. Think of values.yaml as the defaults for the application you are deploying.
NFS CSI Driver
With the NFS CSI Driver I will use Kubernetes to dynamically manage the creation and mounting of persistent volumes to pods using the Synology NAS as the central storage server. Here is some additional technical information for your reference:
- Kubectl quick reference here
- Helm cheat sheet here
- Helm Chart reference here
- Kubernetes Storage Class docs here
- What is network-attached storage (NAS)?
- What is NFS?
- An excellent blog written by Rudi Martinsen on the NFS CSI Driver with step-by-step instructions for reference here
Now let’s get started:
- On your local machine open your favourite terminal
- Switch to the
kube-systemnamespace
kubectl config set-context --current --namespace=kube-system
- Helm repo add
helm repo add csi-driver-nfs https://raw.githubusercontent.com/kubernetes-csi/csi-driver-nfs/master/charts
- Helm repo update
helm repo update
- Helm repo install
helm install csi-driver-nfs csi-driver-nfs/csi-driver-nfs --namespace kube-system --version v4.6.0 \
  --set controller.dnsPolicy=ClusterFirstWithHostNet \
  --set node.dnsPolicy=ClusterFirstWithHostNet \
  --set kubeletDir="/var/snap/microk8s/common/var/lib/kubelet" # The Kubelet has permissions at this location to mount the NFS shares
- Kubectl show me the pods
kubectl get pods

- Now let’s create a Storage Class to be used for central data access between our nodes and pods. Create a file called
nfs-setup.yaml, copy the YAML below and runkubectl apply -f nfs-setup.yaml.
apiVersion: storage.k8s.io/v1
kind: StorageClass
metadata:
  name: nfs-csi-default
provisioner: nfs.csi.k8s.io
parameters:
  server: <your nfs server ip goes here>
  share: /volume4/pi8s/
  # csi.storage.k8s.io/provisioner-secret is only needed for providing mountOptions in DeleteVolume
  # csi.storage.k8s.io/provisioner-secret-name: "mount-options"
  # csi.storage.k8s.io/provisioner-secret-namespace: "default"
allowVolumeExpansion: true
reclaimPolicy: Delete
volumeBindingMode: Immediate
mountOptions:
  - nfsvers=4
- Kubectl shows the Storage Class
kubectl get sc

- Let’s make this the default Storage Class as in the above image
kubectl patch storageclass nfs-csi -p '{"metadata": {"annotations":{"storageclass.kubernetes.io/is-default-class":"true"}}}'
- If you want to undo making it the default Storage Class
kubectl patch storageclass nfs-csi -p '{"metadata": {"annotations":{"storageclass.kubernetes.io/is-default-class":"false"}}}'
- Great! We now have Kubernetes managing NFS volume mounts dynamically for us to our NAS (Network Attached Storage)!
MetalLB load-balancer for bare metal Kubernetes
With MetalLB we will setup a unique IP address on our home network to expose the Microservices running in our Kubernetes cluster. A public cloud provider would give you this during the deployment of your Kubernetes cluster but since we are the cloud we need to provide it and thats where MetalLB comes in.
- Kubectl quick reference here
- Helm cheat sheet here
- Helm Chart on ArtifactHub here
- MetalLB concepts here
- Choose an IP address on your private home network that does not fall inside your DHCP pool for MetalLB to use
- Helm repo add
helm repo add metallb https://metallb.github.io/metallb
- Helm repo update
helm repo update
- Helm install MetalLB in the
metallb-systemnamespace
helm install metallb metallb/metallb -n metallb-system
- Kubectl switch to the
metallb-systemnamespace
kubectl config set-context --current --namespace=metallb-system
- Kubectl show me the MetalLB pods in the
metallb-systemnamespace
kubectl get pods

- Now lets enable L2 Advertisement and setup our IP pool. Copy the YAML below into
metallb-setup.yamland runkubectl apply -f metallb-setup.yaml
apiVersion: metallb.io/v1beta1
kind: IPAddressPool
metadata:
  name: default-pool
  namespace: metallb-system
spec:
  addresses:
  - 192.168.0.151-192.168.0.151 # change this to your private ip
---
apiVersion: metallb.io/v1beta1
kind: L2Advertisement
metadata:
  name: default-pool
  namespace: metallb-system
spec:
  ipAddressPools:
  - default-pool
- The
ipaddresspools.metallb.iois a CRD which is a custom resource created in our Kubernetes cluster that adds additional magic. Kubectl show all CRDs for MetalLB:
kubectl get crds | grep metallb
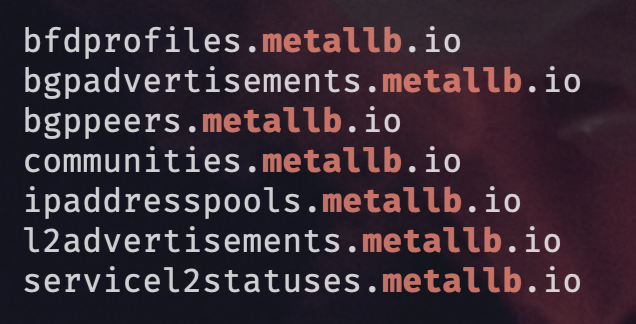
- Kubectl show me the IP address pools for MetalLB
kubectl get ipaddresspools.metallb.io

- Epic we have a working load balancer using a single IP address which will act as a gateway into our Kubernetes cluster which we can control with Traefik Proxy
Traefik the Cloud Native Proxy
With Traefik Proxy we can now direct traffic destined for our Microservices into the Kubernetes cluster and protect our endpoints using a combination of entrypoints, routers, services, providers and middlewares.
- Kubectl quick reference here
- Helm cheat sheet here
- Traefik docs here
- Traefik EntryPoints
- Traefik Routers
- Traefik Services can be divided into two groups
Traefik ServicesandKubernetes Services - Traefik Providers
- Traefik Helm Chart on ArtifactHub here
- Helm repo add
helm repo add traefik https://traefik.github.io/charts
- Kubectl create the Traefik namespace
kubectl create ns traefik-v2
- Kubectl switch to the traefik-v2 namespace
kubectl config set-context --current --namespace=traefik-v2
- Helm repo update
helm repo update
- Helm install Traefik
helm install traefik traefik/traefik --namespace=traefik-v2
- Kubectl show me the pods for Traefik
kubectl get pods

- Using GitHub fork the Traefik Helm Chart
- Clone the Helm Chart to your local machine and enable the Traefik
dashboard, kubernetesCRD and kubernetesIngressinvalues.yamland don’t forget to save FYIthey might already be enabled
## Create an IngressRoute for the dashboard
ingressRoute:
  dashboard:
    # -- Create an IngressRoute for the dashboard
    enabled: true
providers:
  kubernetesCRD:
    # -- Load Kubernetes IngressRoute provider
    enabled: true
  kubernetesIngress:
    # -- Load Kubernetes Ingress provider
    enabled: true
- Because Traefik is deployed with Helm we will use Helm to update our deployment from
values.yaml
helm upgrade traefik traefik/traefik --values values.yaml
- Now we need to deploy an
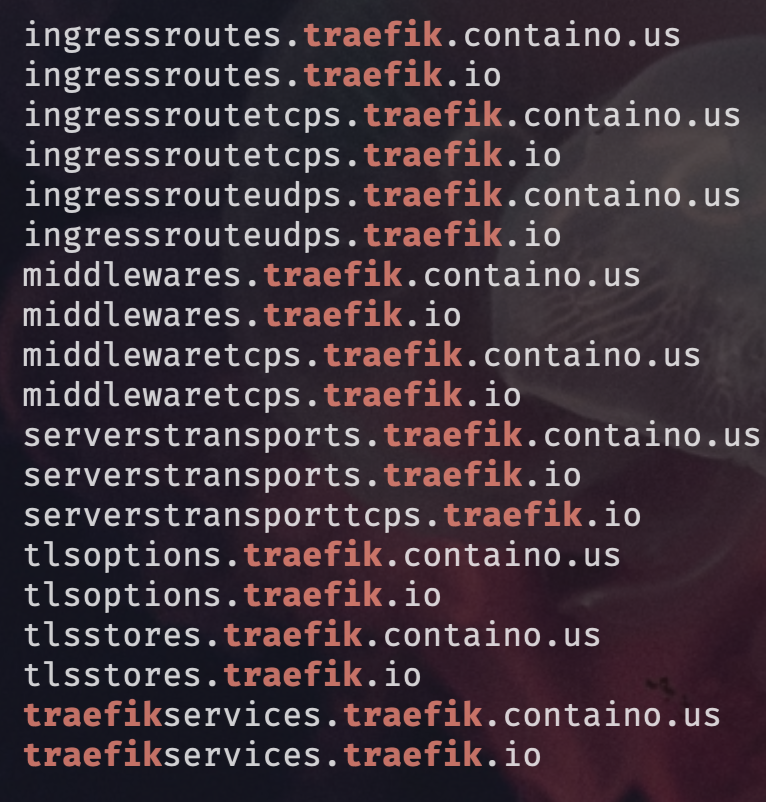
ingress routewhich forms part of the CRDs that were installed with Traefik - CRDs are custom resources created in our Kubernetes cluster that add additional magic
- Kubectl show all CRDs for Traefik
kubectl get crds | grep traefik
- Create a file called
dashboard.yamland apply the following logic withkubectl apply -f dashboard.yaml - You will need a DNS record created either on your DNS server or in localhosts file to access the dashboard
- Edit localhosts on Linux and Mac here with sudo rights
sudo vi /etc/hostsby addingyour private ip and traefik.yourdomain.your tld - Edit Windows localhosts file here as administrator
windows\System32\drivers\etc\hostsby addingyour private ip and traefik.yourdomain.your tld - TLD = Top Level Domain
apiVersion: traefik.io/v1alpha1
kind: IngressRoute
metadata:
  name: dashboard
  namespace: traefik-v2
spec:
  entryPoints:
    - websecure
  routes:
    - match: Host(`traefik.yourdomain.com`) # This where your DNS records come into play
      kind: Rule
      services:
        - name: api@internal
          kind: TraefikService
- Kubectl shows the Traefik ingress routes
kubectl get ingressroutes.traefik.io

- Kubectl shows that the Traefik service has claimed our MetalLB single IP address
kubectl get svc

- Here is a view of the services for all namespaces
NAMESPACE        NAME                                 TYPE           CLUSTER-IP       EXTERNAL-IP     PORT(S)                      AGE
cert-manager     cert-manager                         ClusterIP      10.152.183.42    <none>          9402/TCP                     25h
cert-manager     cert-manager-webhook                 ClusterIP      10.152.183.32    <none>          443/TCP                      25h
default          kubernetes                           ClusterIP      10.152.183.1     <none>          443/TCP                      3d3h
ingress-nginx    ingress-nginx-controller             NodePort       10.152.183.240   <none>          80:31709/TCP,443:30762/TCP   9h
ingress-nginx    ingress-nginx-controller-admission   ClusterIP      10.152.183.118   <none>          443/TCP                      9h
kube-system      kube-dns                             ClusterIP      10.152.183.10    <none>          53/UDP,53/TCP,9153/TCP       45h
metallb-system   metallb-webhook-service              ClusterIP      10.152.183.117   <none>          443/TCP                      3d2h
netdata          netdata                              ClusterIP      10.152.183.164   <none>          19999/TCP                    2d7h
ortelius         ms-compitem-crud                     NodePort       10.152.183.91    <none>          80:30288/TCP                 3m24s
ortelius         ms-dep-pkg-cud                       NodePort       10.152.183.124   <none>          80:32186/TCP                 3m24s
ortelius         ms-dep-pkg-r                         NodePort       10.152.183.82    <none>          80:31347/TCP                 3m22s
ortelius         ms-general                           NodePort       10.152.183.171   <none>          8080:30704/TCP               3m21s
ortelius         ms-nginx                             NodePort       10.152.183.158   <none>          80:32519/TCP,443:31861/TCP   3m19s
ortelius         ms-postgres                          NodePort       10.152.183.75    <none>          5432:30852/TCP               9h
ortelius         ms-scorecard                         NodePort       10.152.183.74    <none>          80:30674/TCP                 3m18s
ortelius         ms-textfile-crud                     NodePort       10.152.183.200   <none>          80:30126/TCP                 3m16s
ortelius         ms-ui                                NodePort       10.152.183.242   <none>          8080:31073/TCP               3m16s
ortelius         ms-validate-user                     NodePort       10.152.183.55    <none>          80:30266/TCP                 3m16s
traefik-v2       traefik                              LoadBalancer   10.152.183.73    192.168.0.151   80:32700/TCP,443:30988/TCP   2d7h
whoami           whoami                               ClusterIP      10.152.183.168   <none>          80/TCP                       47h```
- Brilliant our Traefik Proxy has claimed the IP
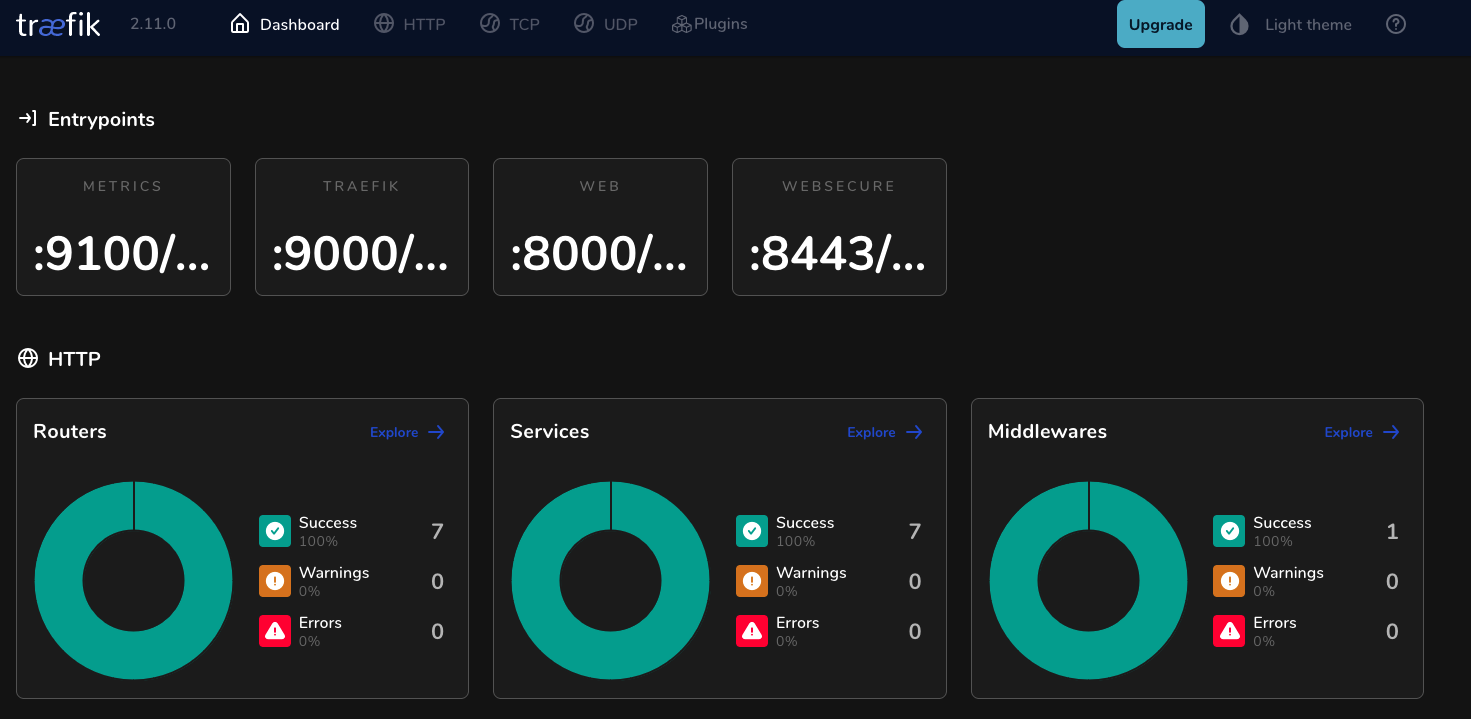
What you see is the traefik service with the TYPE LoadBalancer which means it has claimed the MetalLB IP that we assigned. A CLUSTER-IP is only accessible inside Kubernetes. So now with MetalLB and Traefik we have built a bridge between the outside world and our internal Kubernetes world. Traefik comes with some self discovery magic in the form of providers which allows Traefik to query provider APIs to find relevant information about routing and then dynamically update the routes.
- Hopefully you should be able to access your dashboard at the FQDN (fully qualified domain name) you set
Ortelius the Ultimate Evidence Store
Well done for making it this far! We have made it to the point where we can deploy Ortelius into our Kubernetes cluster and access Ortelius through the Traefik Proxy inside the Kubernetes Ortelius namespace.
- Kubectl quick reference guide here
- Helm cheat sheet here
- Ortelius on GitHub here
- Ortelius docs here
- Ortelius Helm Chart on ArtifactHub here
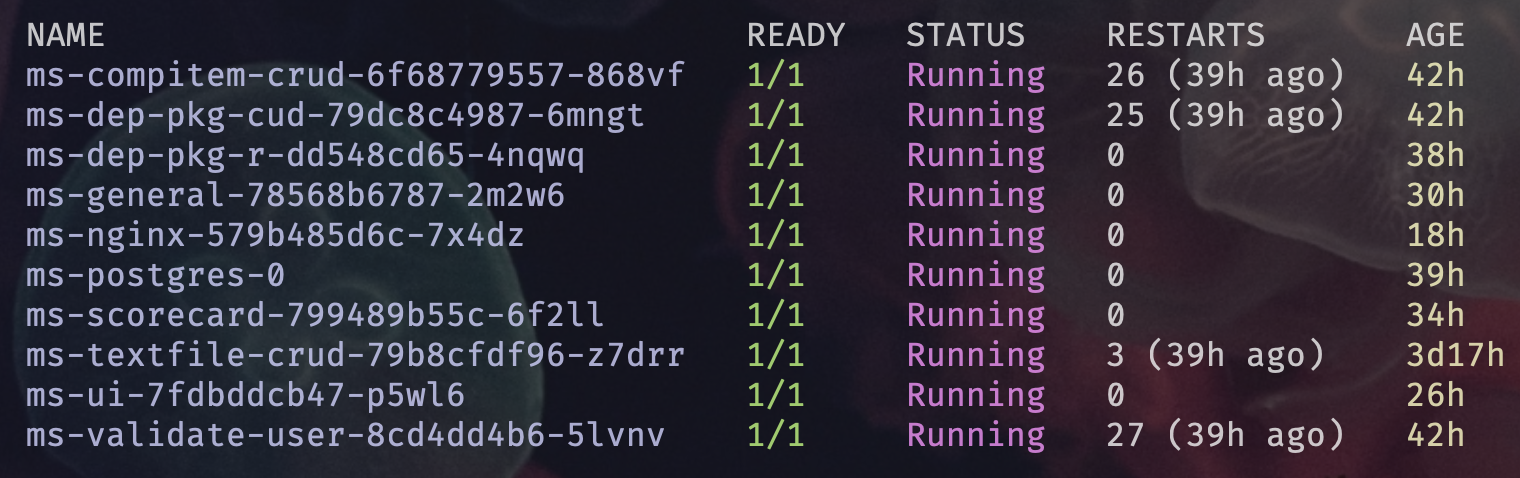
Ortelius currently consists of the following Microservices. The one we are most interested in at this point is ms-nginx which is the gateway to all the backing microservices for Ortelius. We are going to deploy Ortelius using Helm then configure Traefik to send requests to ms-nginx and then we should get the Ortelius dashboard.
Ortelius Microservice GitHub repos
-
Kubectl create the Ortelius namespace
kubectl create ns ortelius
- Kubectl switches to the Ortelius namespace
kubectl config set-context --current --namespace=ortelius
- Helm repo add
helm repo add ortelius https://ortelius.github.io/ortelius-charts/
- Helm repo update
helm repo update
- Helm install Ortelius
helm upgrade --install ortelius ortelius/ortelius --set ms-general.dbpass=postgres --set global.postgresql.enabled=true --set global.nginxController.enabled=true --set ms-nginx.ingress.type=k3d --set ms-nginx.ingress.dnsname=<your domain name goes here> --version "${ORTELIUS_VERSION}" --namespace ortelius
-
Lets stop here to discuss some of these settings.
-
--set ms-general.dbpass=postgres| Set the PostgreSQL database password -
--set global.nginxController.enabled=true| Sets the ingress controller which could be one ofdefault nginx ingress, AWS Load Balancer or Google Load Balancer| Refer to the Helm Chart in ArtifactHub here -
--set ms-nginx.ingress.type=k3d| This setting is for enabling the Traefik Class so that Traefik is made aware of Ortelius even thou its for K3d another very lightweight Kubernetes deployment which uses Traefik as the default ingress -
The
k3dvalue enables the Traefik ingress class to make Traefik Ortelius aware. -
--set ms-nginx.ingress.dnsname=<your domain name goes here>| This is URL that will go in your browser to access Ortelius -
Kubectl show the pods for Ortelius
kubectl get pods
- Now we will deploy a Traefik ingress route for Ortelius by applying the following YAML. Create a YAML file called
ortelius-traefik.yaml, copy the YAML into the file and then run:
kubectl apply -f ortelius-traefik.yaml`
apiVersion: networking.k8s.io/v1
kind: Ingress
metadata:
  annotations:
    traefik.ingress.kubernetes.io/router.entrypoints: web
  labels:
    app: ms-nginx
  name: ms-nginx-traefik
  namespace: ortelius
spec:
  ingressClassName: nginx
  rules:
  - http:
      paths:
      - backend:
          service:
            name: ms-nginx
            port:
              number: 80
        path: /
        pathType: Prefix
status:
  loadBalancer: {}
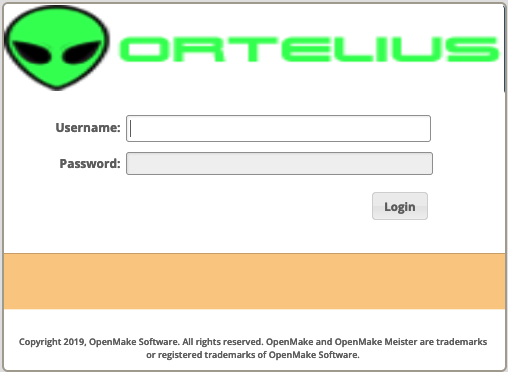
- You should be able to reach the Ortelius dashboard in your browser using the domain name you chose for example mine was
https://ortelius.pangarabbit.com
Happy alien hunting…….

Conclusion
By this stage you should have three Pi’s each with the NFS CSI Driver, Traefik and Ortelius up and running. Stay tuned for Part 4 where we use Cloudflare, Traefik and LetsEncrypt to implement HTTPS and TLS v1.3. Yes there is more extraterrestrial life in a cloud deployment near you……..
Disclaimer: Any brands I mention in this blog post series are not monetized. This is my home setup!
